Research Resources : Google Earth Paths and Labels
Creating Paths
Working with Google Earth – Adding Paths & Labels
 In this example, we will redraw the bison range boundaries using the image overlay as a template. These paths will replace the overlay.
1. Click on the Bison Range folder in the Places panel. Note: If you forget to click on the folder before you create the line, you can drag and drop the lines into the folder like you did with the overlay.
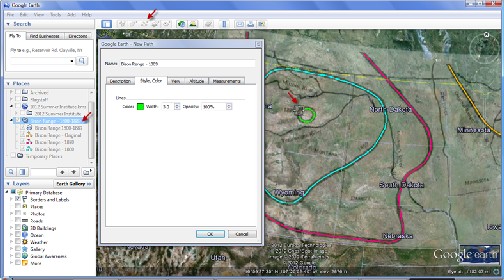
2. Select the Path tool from the Google Earth menu bar.
3. Enter a descriptive name in the Properties box that appears.
4. Click on the Style, Color tab in the Properties box.
5. Change the line color by clicking on the Color box.
6. Set the Width and Opacity for the line.
7. Leave the Properties box open to allow you to create the line. The Properties box can be moved out of the way by clicking and dragging the top of the box.
8. To trace the lines that show the extent of the bison range as represented on the Bison Range map image overlay, click on the starting point for the line you would like to create.
9. Continue tracing the line by clicking at intervals along the line. Click at close intervals to create a smoother line.
Note: You can adjust the line by clicking on points in the line and dragging them to make the line more closely fit the Bison Range map, but this may be more difficult to do. It is best to try to create an accurate line, rather than adjust the line later.
10. When you have traced the extent of the line, press the OK button in the Properties box.
11. Create a new line to show the extent of the bison range for each year represented in the map image overlay. To create the additional lines, follow the instructions again, but choose a different color for each line.
Note: Lines and Polygons can be added and formatted in the same manner.
Adding Labels to the Paths
1. Click on the Bison Range folder in the Places panel.
2. Select the Pushpin icon from the menu bar.
![]()
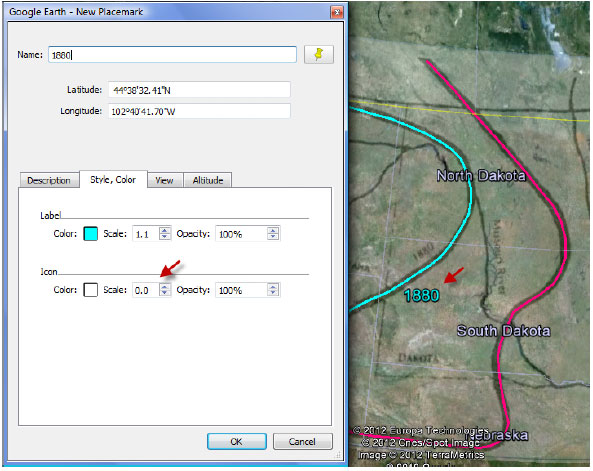
3. Enter the label you would like to use in the Name field of the Properties box.
4. With the Properties box open, drag and drop the Pushpin to the location where you would like to place the label.
5. Open the Style, Color tab in the properties box.
6. Click on the Color box to change the color of your label and icon.
7. Click on the Icon box to choose the icon you would like to use.
8. Adjust the label and icon size in the Styles, Color tab.
Note: In this example, the color of the label was set to match the color of the line. The icon was removed by setting its size to 0. If you choose to remove the icon, you may need to adjust the placement of the label after you have clicked OK in the Properties box. To adjust the placement of the label:
1. Right click on the label name in the Places panel and select Properties from the menu.
2. Increase the size of the icon to activate the drag and drop feature.
3. Move the icon to the new location.
4. Set the size of the icon back to 0, and press OK.
You may need to do this several times before you are satisfied with the location of the label.
9. Repeat the process for each label you would like to add.