Research Resources : HTML: Basic Guide
What is HTML?
Hyper Text Markup Language, or HTML, is a language for describing web pages. The purpose of a web browser is to read HTML documents and display them as web pages. The browser uses HTML tags to interpret and display the content of a page.
The PBworks Wiki “writes” HTML code and style elements as you format text with the rich text editor. You can view the code for a wiki page by pressing the <> Source button on the menu bar of the editor.
To add images and videos you will need to do some simple editing in the Source code, so it is important to know some HTML basics.
HTML Tags
HTML tags and style elements (enclosed in angle brackets: < >) define the structure of content and how it should look. The start tag tells the browser to begin formatting as specified by the HTML tag. The end tag tells the browser to end the formatting. For example, the paragraph start and end tags look like this: <p>paragraph text here</p>. The end tag includes a forward slash to signal the end of the formatting. With a few exceptions, tags must have both an opening and a closing tag.
Heading Tags
Heading tags display text using larger sizes of the default font depending on the level of the heading. Although heading tags change the text size and appearance, you will still need to apply formatting to your text if you would like it to have the same font and appearance in different browsers.
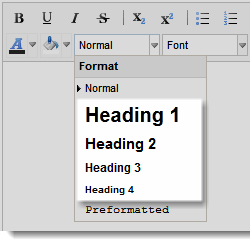
In the PBworks Wiki, there are four heading levels. When you apply headings to your text, the wiki will write HTML for those headings in the source code:
|
HTML CODE |
|
<h1>Heading 1</h1> |
|
<h2>Heading 2</h2> |
|
<h3>Heading 3</h3> |
|
<h4>Heading 4</h4> |
Headings are important because assistive technologies like screen readers and magnifiers rely on them to help users navigate a page. Heading levels should be used in order, with h1 being the most important heading and h4 being the least important. This allows users to identify titles, subtitles, and other section headings. Heading tags are also used by search engines to identify key words for your page.
Important note: Heading 1 is typically used for the main title of a page. However, the GooWi Explorers website has used Heading 1 for the words “STUDENT WORK SHOWCASE” at the top of the page where your project web page will be displayed, so you will need to use Heading 2 for your page title and Heading 3 for subtitles.
Paragraph Tags
The paragraph code is the letter “p”. To format text as a paragraph, you should select Normal for the text type in the rich text editor. As with headings, you will need to apply formatting, (e.g. font, color, size), to maintain text appearance in different browsers.

This is the corresponding HTML code for text that is formatted as Normal, or paragraph, text:
|
HTML CODE |
OUTPUT |
|
<p>See that we began the first test paragraph with the start tag. After this sentence, we will put the end tag to finish the paragraph.</p> <p>Because we begin with a new paragraph start tag, this text is going to be in the next paragraph.</p> |
See that we began the first test paragraph with the start tag. After this sentence, we will put the end tag to finish the paragraph. Because we begin with a new paragraph start tag, this text is going to be in the next paragraph. |
Note: On occasion you may need to manually add or delete blank lines -- you can do this by manually deleting or adding paragraph tags. Balloons will usually have blank lines when you transfer code from the wiki to the balloon. To fix this, delete empty paragraph tags: <p> </p> ( is the code for a blank space). To add a blank line, enter a set of paragraph tags: <p></p>.
Adding Images and Videos
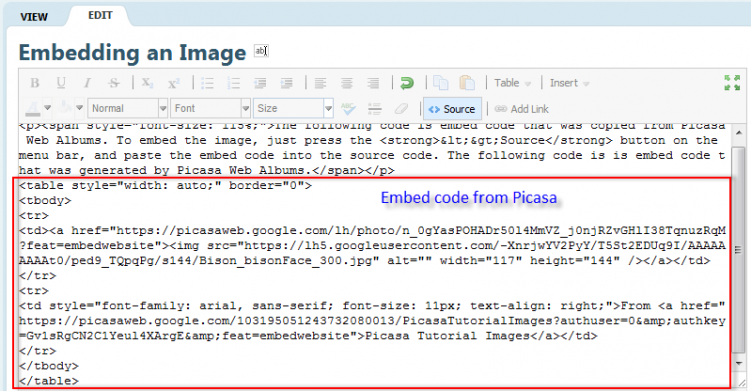
To add an image or a video, you will need to copy embed code from Picasa Web Albums or YouTube and paste it into the Source code for your wiki page.
Input (source code view):
Output (rich text editor view):
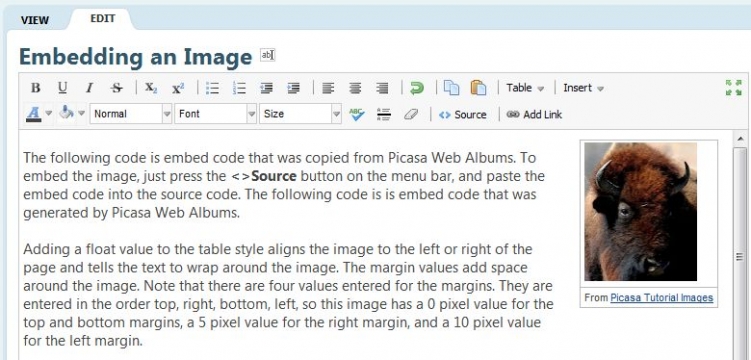
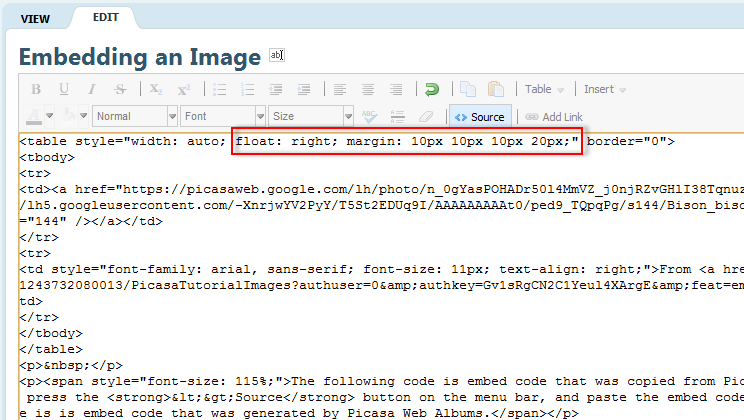
Note: The image is embedded in a table. You can change the layout of the image by adding a few style elements to the table’s style list.
Float property
Adding a float value to your style declaration tells the object to “float” to the right or left of content, so that text wraps around it.
|
Table: |
<table style="width: auto; float: right;" border="0"></table> |
|
YouTube Video: |
<iframe style="float: right;" src="URL here" width="480" height="360"></iframe> |
Margin property
Margin values add space around an object. Margin values are entered in the order top, right, bottom, left. The following margin style will add 10 pixels of space at the top, left, and bottom margins of the object, and 20 pixels of space at the left margin.
|
Table: |
<table style="width: auto; float: right; margin: 10px 10px 10px 20px;" border="0"></table> |
|
YouTube Video: |
<iframe style="float: right; margin 10px 10px 10px 20px;" src="URL here" width="480" eight="360"></iframe> |
Note:If you choose to insert images that are not embedded in a table, you can add float and margin values to the list of image styles to achieve the same effect. (Be sure to add your image caption and credit using a program like PhotoShop or Paint.)
Input (source code view):
Output (rich text editor view):

