Research Resources : Image Editing Programs
Image Editing Program Overview
Quick Start Guides for these programs appear below the tables. To open a Quick Start Guide for an individual program, click on the link for that program.
|
Program |
Crop |
Resize |
Brightness & Contrast |
Color Balance |
Red Eye Removal |
Rotate & Flip |
Paint Tools |
|---|---|---|---|---|---|---|---|
|
Y |
Y |
|
|
|
Y |
Y | |
|
Y |
Y |
Y |
Y |
Y |
Y |
| |
|
Y |
|
Y |
Y |
Y |
rotate only |
| |
|
Y |
|
Y |
Y |
Y |
rotate only |
| |
|
Picasa 3 |
Y |
see notes |
Y |
Y |
Y |
Y |
|
|
Creative Kit (aka Picnik) *online |
Y |
Y |
Y |
Y |
Y |
Y |
|
|
Photoshop |
Y |
Y |
Y |
Y |
Y |
Y |
Y |
Additional considerations:
|
Program |
Availability |
Notes |
|---|---|---|
|
Paint |
Installed on all Windows and Mac computers |
+ Add text to images (captions); Create illustrations with basic paint tools; - No advanced image editing tools (color balance, brightness and contrast, etc.) |
|
Microsoft Office Picture Manager |
Installed with all Office Suites (in Microsoft Office > Tools) |
+ Batch edit multiple pictures, Manage image folders within the program; - No text tools |
|
Windows Photo Gallery |
Installed on all computers running a version of Windows |
+ Manage image folders from within the program, Create slideshows and movies; - No text tools |
|
Windows Live Photo Gallery |
Available to Windows Vista and Windows 7 users |
+ Additional editing tools: Straighten, Adjust detail, Effects; Create slideshows and movies; - No text tools |
|
Picasa 3 |
Free download |
+ Add text; Additional editing tools: Straighten, Retouch, Color fixes, Image processing; Create slideshows and collages; **Resize only available upon export or upload; Interfaces with Picasa Web Albums and Google+ |
|
Creative Kit |
Free online |
+ Add text; Additional editing tools: Effects, Sharpen, Decorate; Accessible within Google+ or Picasa Web Album; **Also known as Picnik |
|
Photoshop |
Available with all Adobe Creative Suites or as a standalone program |
+ Add text; Create illustrations with extended toolset: gradients, layers, filters, etc.; Advanced editing capabilities; Best for intermediate & expert users |
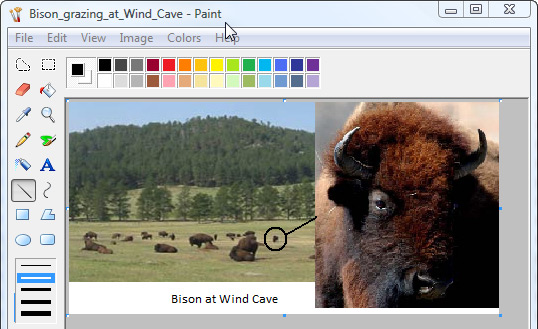
Quick Start Guide: Paint
This tutorial covers the basic steps for using Paint. The program’s look and functionality may be slightly different on your computer, depending on the operating system you are using. This tutorial was created using a computer running Windows Vista Home Premium.
Note: Paint is a excellent program for making simple edits, like resizing and cropping images. For more advanced edits, like adding text or drawing, be aware that paint does not allow you to make changes once you’ve completed your edit. If you need to change text or drawing that you’ve already exited out of, use Ctrl + Z to undo the change and then add it again.
Launching Paint
To open Paint, click the Start button, select All Programs, click on the Accessories folder, and then click Paint.

Open the File menu and click Open to navigate to the image you would like to edit.

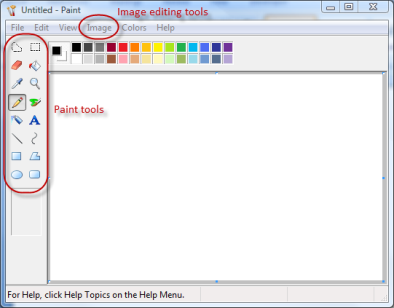
To use a paint tool, click on an icon in the sidebar. Settings for the tool will appear in the area below the paint tools. To use an image editing tool, open the Image menu.
Resizing an Image
There are two ways to resize an image in Paint. Use the Resize/Skew option if you prefer to adjust the size using percentages, or use the Attributes option to enter exact values for the width and height.
To use the Resize/Skew…option 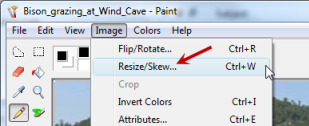
1. Open the Image menu
2. Select Resize/Skew…
3. Change the percentage values

4. Press OK
To
use the Attributes… option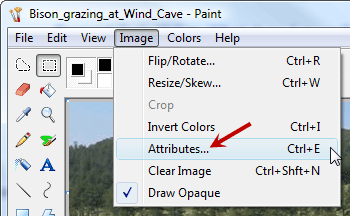
1. Open the Image menu
2. Select Attributes…
3. Choose a unit of measurement (Inches,Cm,Pixels)
4. Enter new Width
and Height values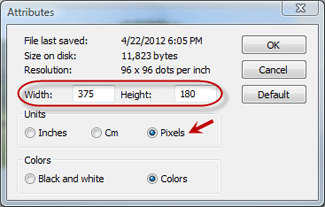
5. Press OK
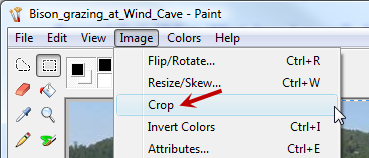
Cropping an Image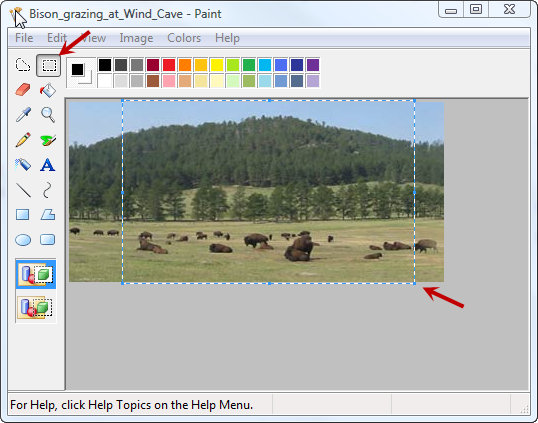
Click the Select tool icon
Click on the image and drag to select the crop area
Open the Image menu
Select Crop
Adding Text to an Image
Click on the Text tool icon
Click on the image and drag to create a text box
Choose an opaque or transparent background
Enter text
Right click on the text box
Select Text
Toolbar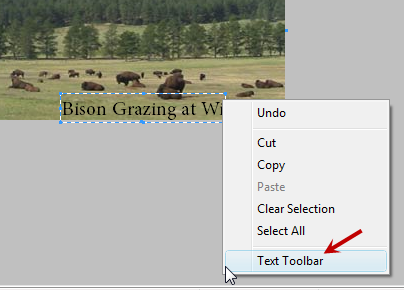
Choose font options
When you are satisfied with the look and location of your text, click outside of the text box to finalize your choices.
Note: Once you’ve exited the text box, you can no longer move it, resize it, or edit its contents. To make changes, remove the text box by pressing Ctrl + Z (Undo) and start over.
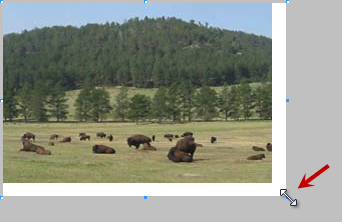
Resizing the Canvas
Extending the canvas size allows you to add text, paint, or additional images outside the boundaries of your photo.
To change the canvas size, hover over the canvas “handles” until the resize arrows appear. Then click and drag the canvas to the desired size.
Add an image caption and credit, a brief description, or create a drawing in the new canvas area. To add images, open the Edit menu, select Paste from…, and then open the image you would like to add. After you’ve pasted the image, you can reposition it and resize it using the image “handles.”
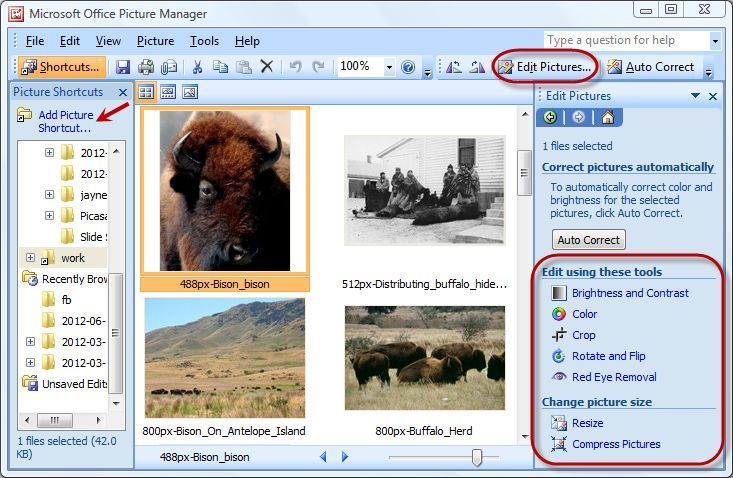
Quick Start Guide: Microsoft Office Picture Manager
The functionality and appearance of this program may differ slightly on your computer depending on the version of Office Suite you have installed. The version depicted here is Microsoft Office Suite 2007.
Note: This is a very straightforward, easy-to-use image editing and management tool. One drawback is that, by default, edited images are saved in the same format as the original image, even if you select the Save As option from the File menu. To change the file format, you must open the File menu, select Export, and then choose a new file type in the panel that appears.
Launching the Program
Open the Start menu > select All Programs > click on the Microsoft Office folder > within that folder, click on the Microsoft Office Tools folder > click on Microsoft Office Picture Manager to launch the program.
Editing Images
1. Click on Add Picture Shortcut to map a path to an image folder.
2. Select an image to edit. To edit multiple images, click on an image and press the Ctrlbutton while selecting additional images. To select a series of images, click on the first image in the series and then press the Shift button while selecting the last photo in the series.
3. Press Edit Pictures to access image editing tools.
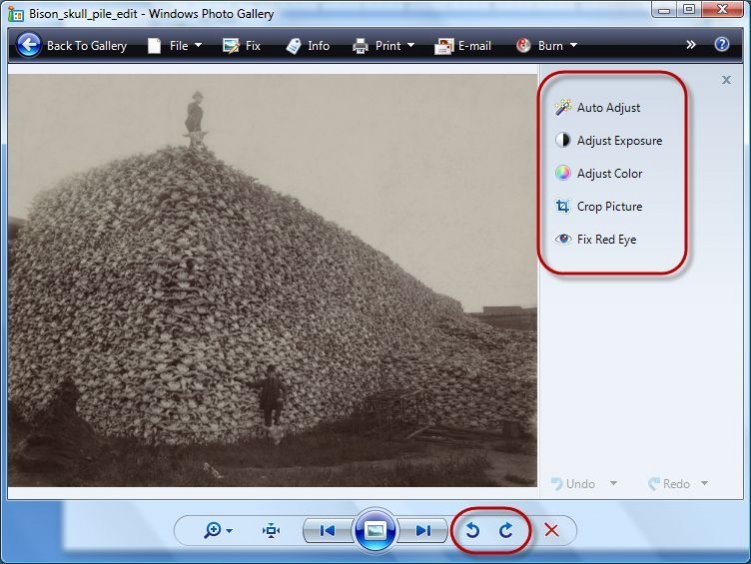
Quick Start Guide: Windows Photo Gallery
The functionality and appearance of the program on your computer may be different than the program depicted here, depending on the version of Windows you are using. The version depicted here is from Windows Vista Home Premium.
Launching the Program
Open the Start menu > Click All Programs > Click Windows Photo Gallery to launch the program.
Editing Images
1. Open the image folder from the left sidebar panel (If the folder doesn’t appear in the panel, you can add it by opening the File menu and selecting Add Folder to Gallery…)
2. Click on the image you would like to edit
3. Click Fix on the top menu bar

4. Select an image editing tool from the right panel (Note: The rotate tools appear below the image.)
5. PressCtrl + S to save or press the Next button to save and advance to the next photo.
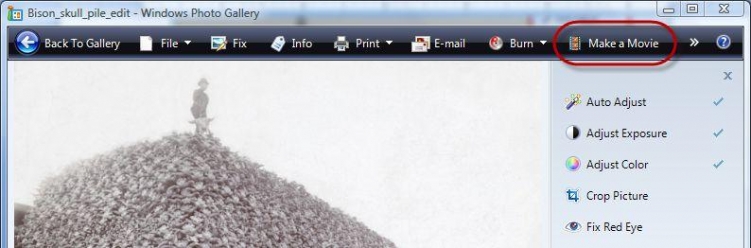
Launching Windows Movie Maker
Click on the Make a Movie button on the top menu bar to open Windows Movie Maker. There, you can create a slideshow or a movie from your images, with narration, effects, and transitions. See the Windows Movie Maker tutorial for more information.
Quick Start Guide: Windows Live Photo Gallery
The functionality and appearance of the program on your computer may be different than the program depicted here, depending on the version of Windows you are using. The version depicted here is from Windows Vista Home Premium.
Note: This program is very similar to Windows Photo Gallery, but it has a few additional options like Straighten,Adjust Detail, and Black & White Effects.
Launching the Program
Open the Start menu > Click All Programs > Open the Windows Live folder > ClickWindows Live Photo Gallery
Editing Images
1. Click on the image folder on the left side navigation panel (If the folder doesn’t appear in the panel, you can add it by opening the File menu and selecting Include a Folder in the Gallery…)
2. Click on the image you would like to edit
3. Click Fixon the top menu bar

4. Select an image editing tool from the right panel (Note: The rotate tools appear below the image.)
5. PressCtrl + S to save or press the Next button to save and advance to the next photo
Launching Windows Live Movie Maker
Open the Make menu on the top menu bar and select Make a movie… There, you can create a slideshow or a movie from your images, with narration, effects, and transitions. See the Windows Live Movie Maker tutorial for more information.
