Research Resources : Google Earth Screen Overlays
Creating a Screen Overlay
Working with Google Earth – Screen Overlays
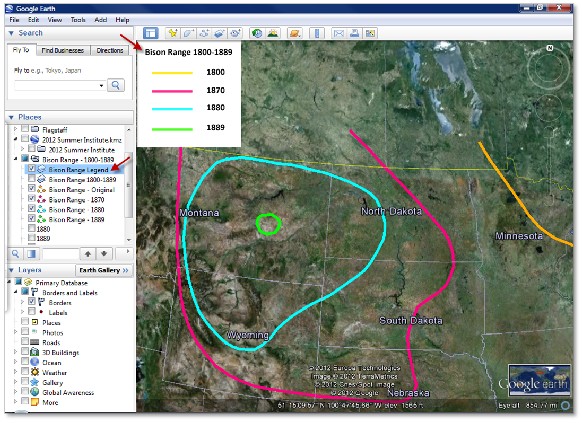
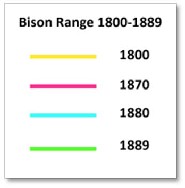
 As an alternative to using labels, a Screen Overlay can be used to create a legend for the map lines. Unlike an Image Overlay, which is affixed to the earth and moves with the earth in Google Earth, a Screen Overlay is affixed to the screen and remains static as you move the earth.
Applications like PhotoShop make it easy to create Screen Overlays. If you don’t have access to PhotoShop or a similar program, you can use Microsoft Paint. To use Microsoft Paint:
1. Open the Start menu on your computer.
2. Select Accessories in the program list.
3. Click on Paint to launch the program.
Note: The Screen Overlay used in this example was created in PhotoShop. It is best to create a Screen
Overlay at a size that works well in Google Earth. A good size for a legend is between 200‐250 pixels.
To add the Screen Overlay, we must use Keyhole Markup Language (KML). KML is similar to HTML and XML in that it allows us to add formatting in Google Earth. Google Earth automatically wrote KML for us when we created Lines and the map Image Overlay previously in the tutorials. To see the KML from our map Image Overlay:
1. Right click on the map Image Overlay in your Places panel.
2. Select Copy from the drop down list.
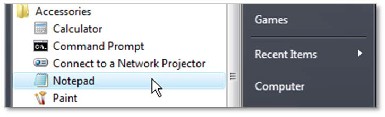
3. Open Notepad on your computer. To open Notepad:
a. Open the Start menu. b. Select Programs.
c. Click on Accessories in the Programs menu.
d. Click on Notepad to open the application.
4. Press Ctrl + V to paste the KML into Notepad.
Note: When working with KML, it is important to use Notepad or another text editor. Programs like Word include formatting when text is copied from them. The formatting interferes with KML when it is pasted into Google Earth.
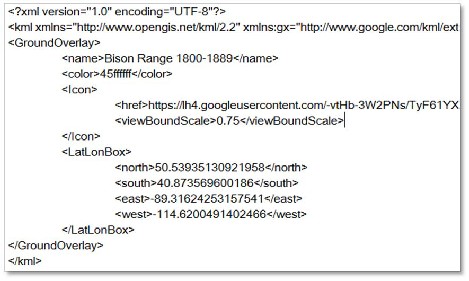
The KLM for the map Image Overlay will look something like this:
KML isn’t as intimidating as it looks! The GooWi Explorers team has provided a KML template for Screen
Overlays in the Resources folder of your PBworks Wiki.
Editing the KML Template for your Screen Overlay
To begin adding your Screen Overlay to Google Earth, follow the steps in the Picasa Web Albums tutorial to upload your image to Picasa Web Albums. Copy the image link as you did for the map Image Overlay.
1. Click on the Resources folder in your wiki.
2. Open the screenOverlay document.
3. Press the Download tab. This will open the document in your web browser.
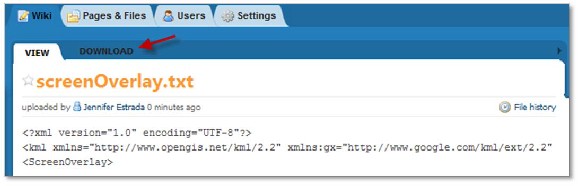
4. Click on the text in the web browser.
5. Press Ctrl + A to select all text.
6. Press Ctrl + C to copy the KML code.
7. Open the Notepad program on your computer.
8. Press Ctrl + V to paste the code into your Notepad document.
9. Save the Notepad document with a new name (e.g. Bison_Range_Legend.txt). No spaces!
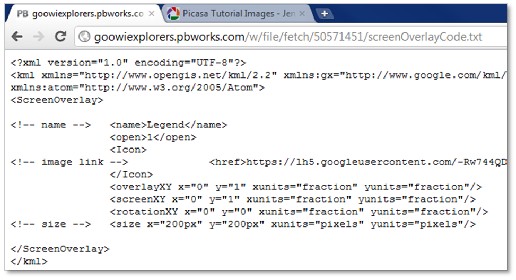
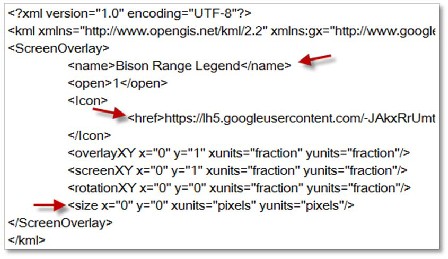
Now that the KML Screen Overlay template is in a Notepad document, you just need to change a few entries to customize it to your overlay.
1. Highlight the <name> field in the KML and enter the name you would like to use for your Screen Overlay.
2. Highlight the link between the <href> tags and paste the Picasa Web Albums link to your image.
3. Enter the dimensions that you used when you created the image in the <size> field. x refers to the width of the image and y refers to the height.
4. When you are done editing, press Ctrl + A to select all text.
5. Press Ctrl + C to copy the text.
Adding the Screen Overlay to Google Earth
1. Right click on your project folder in the Places panel.
2. Select Paste from the drop down menu.
3. The legend will appear as a Screen Overlay in Google Earth.